Do you have a Dobsonian telescope like an Apertura AD8 and a desire to explore the exciting world of astrophotography? If so, follow along to learn what you need to know to use your Dobsonian telescope for astrophotography!
Loved for their ease of use, iconic design, and excellent visual performance, Dobsonian telescopes have revolutionized amateur astronomy. But can these light buckets be used for astrophotography?
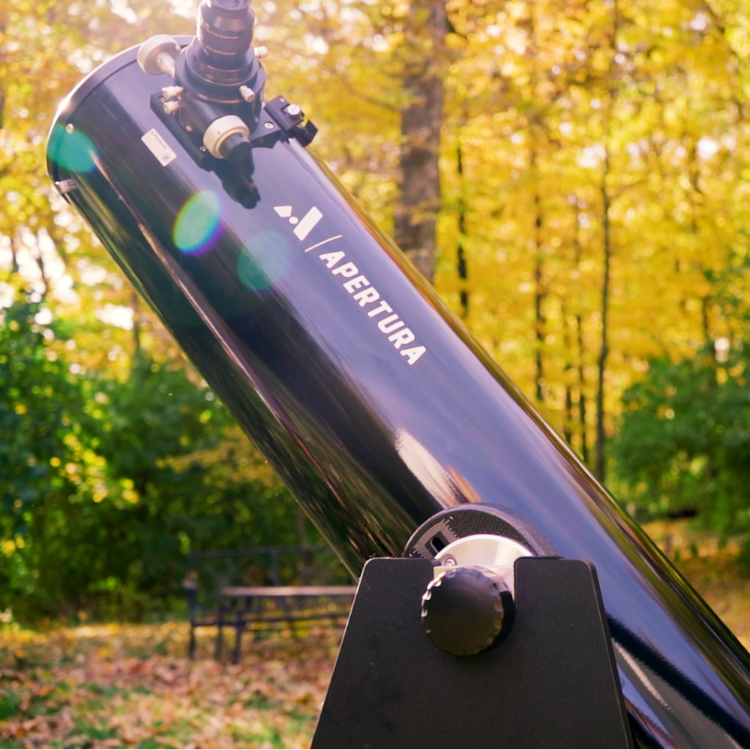
In short, yes, there are plenty of ways to capture stunning images through a Dobsonian Telescope. With massive apertures and long focal lengths, Dobsonian telescopes provide ample light gathering potential, and their iconic "rocker box" base is perfect for smooth manual tracking. With that said, there are a few things to keep in mind when using a Dobsonian telescope for astrophotography.
When John Dobson designed his famous sidewalk telescope (later referred to as a Dobsonian telescope) he aimed to make visual astronomy more accessible. This is, in part, why Dobsonian telescopes are known for their practical design. Central to this practical design is the modified alt-azimuth mount the telescope rests on, known as a “rocker box”. While similar mounts had previously been used with large Newtonian telescopes, Dobson's rocker box was unique in it's simplicity and ease of use. However, in order to address the needs of visual observation, Dobson omitted some features that are helpful for astrophotography, such as the ability to smoothly track the motion of the sky.[1]
Regardless of the design, Dobsonian telescopes are easy to adapt for astrophotography use and can produce some incredible images. So, with the above points in mind, let's dive into the tools needed to capture the cosmos through a Dobsonian telescope!
[1]Neil English, Choosing and Using a Dobsonian Telescope. Springer New York, July 25, 2011.
What’s needed to use your Dob for Astrophotography?
To use a Dobsonian telescope for astrophotography, you only need a camera and an adapter to connect the camera to the telescope. The type of adapter will depend on the camera you plan to use and typically, there are three types of cameras you can choose from: a smartphone camera, a DSLR or Mirrorless camera, or a dedicated astrophotography camera. Check out our guide to learn everything you need to know about Connecting a Camera to a Telescope!
Tips
If you’re just starting out, we recommend using a smartphone or DSLR before investing in a dedicated astrophotography camera. This will give you the chance to learn more about the hobby and build your skills before purchasing a camera that can only be used for astrophotography.
What Can You Image with a Smartphone and Dob?
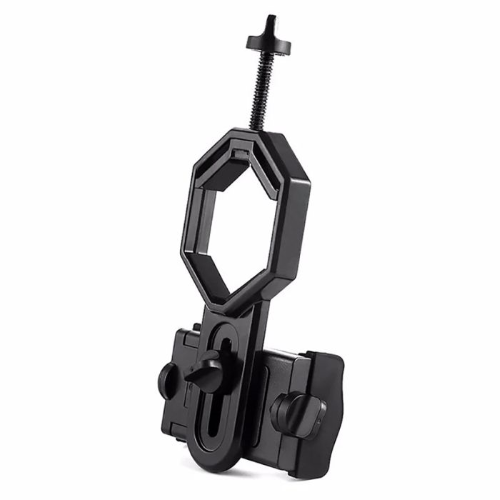
The latest smartphones sport powerful cameras with unparalleled ease of use. So, it's no surprise that they can be used for astrophotography. But how do you attach a smartphone to a Dobsonian telescope and what can you capture?
Attaching a smartphone to a Dobsonian telescope is relatively straightforward, all you need is an adapter, like the Apertura Smartphone Astrophotography Adapter, that can mount and align your device to the telescope's eyepiece. Once attached and aligned, you'll be able to capture stunning images of the Moon, Jupiter, Saturn, and when used with the correct solar filter, you can even image the Sun (never point a telescope at the Sun without a solar filter)! You can also capture images of comets, star clusters, and even some bright deep sky objects like the Andromeda galaxy!
Beyond astrophotography, attaching a smart device to your Dobsonian has other benefits. Their bright screens make them great for visual use as well, and some smartphones can even cast their screen to nearby devices, allowing you to share your view with groups of people. You can also quickly share your experience with others and even live stream your views. The possibilities to share are endless!
Tips
The type of images that can be captured with a smartphone and Dobsonian telescope will depend on the device, the scope, and eyepiece. Most devices are capable of imaging a variety of objects, and some of the latest smartphones feature a "night mode" or "astro mode" that can enhance overall image quality.
What can you capture with a DSLR or Mirrorless Camera and Dobsonian telescope?
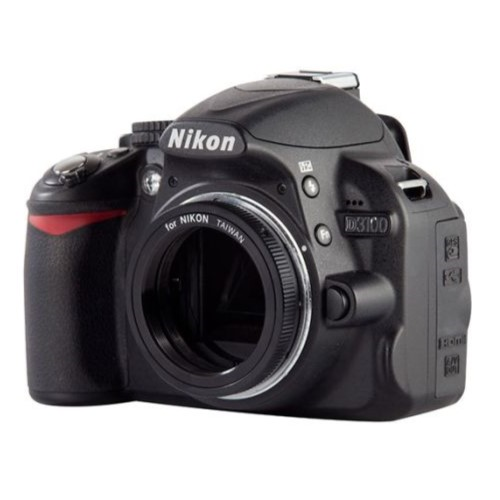 If you’re ready to level up from smartphone astrophotography, attaching a DSLR or mirrorless camera to your Dobsonian can expand your imaging capabilities! But how do you attach a DSLR or mirrorless camera to your Dobsonian telescope and what can you capture?
Attaching your camera to any telescope is much like attaching a massive photographic lens, and to make this work, you'll need a T-Ring Adapter that fits the lens mount of your camera. Unlike a conventional camera lens, Dobsonian telescopes use fixed mirrors and external focusers. This means you have to move the camera body closer to, or away from, the body of the telescope scope to focus the image. However, before you can start snapping shots of the cosmos through your Dobsonian and DSLR combo, you’ll need to learn a bit about back focus.
Back focus is the distance between the focal plane (point where the rays of light converge) and the sensor of the camera. Knowing this distance is important for determining your camera's compatibility will be able to reach focus when attached to the telescope. So, before attaching your DSLR or mirrorless camera to your Dobsonian, take a moment to make sure the camera will be able to reach focus. If you haven’t already, review our article on Connecting a Camera to a Telescope!
When imaging the night sky with a DSLR or Mirrorless camera and Dobsonian telescope, you’ll be able to capture a wide variety of objects. With the right focal length scope, you’ll be able to image luminous details of the lunar surface, the rings of Saturn, and even fast-moving objects like the ISS! And with the expanded options for controlling the camera, you’ll be able to tune your settings to capture a variety of views. You’ll even have the option to further process your images with an editing program like Photoshop, and stack multiple frames to create highly detailed images.
Tips
If you find that your camera cannot reach focus when attached to your Dobsonian telescope, try using a Apertura 2X Barlow Lens with T2 Threads. This piece of equipment will essentially decrease the back focus distance, allowing your camera to reach focus. However, it will also increase the magnification of the view, making large objects like the Moon take up more of the frame. Depending on the focal length of the telescope, size of the camera sensor, and multiplying factor of the Barlow, results will vary. Some pairings work better than others, but so long as you can reach focus, you'll be able to start capturing images!
What Can You Capture with a Dedicated Astrophotography Camera and Dobsonian Telescope?
Much like the previous pairing, the dedicated astro-cam and Dobsonian combo is very powerful. But how do you attach a dedicated astrophotography camera to a Dobsonian telescope, and what can you capture?
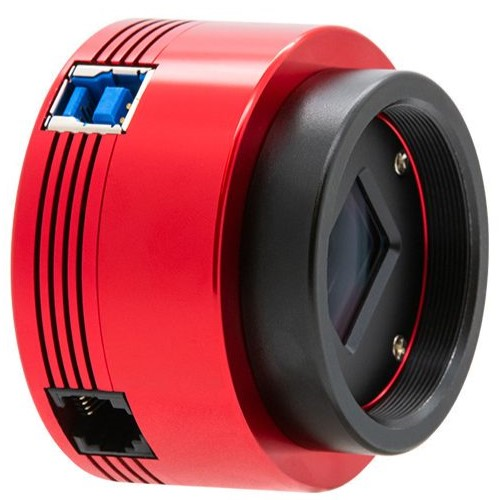
All you'll need is an adapter that fits the visual back of the telescope, and a device to control the camera. This is typically done with a PC or compatible smart device. Some cameras allow for wireless connections, while others need to be connect via usb cable. Once attached, you can use a software like SharpCap to capture images, or videos, of the Moon, planets, and more! And with the expanded sensitivity of the sensor, you can even capture the hidden details of many celestial objects.
Not all celestial objects can be captured with the same camera. This is why there is a wide variety of astro-cams to choose from. Currently, one of the best models for Dobsonian based astrophotography is the ZWO ASI585MC. This "puck" style astro-cam is well suited for manually tracking objects, and small pixel size is perfect for capturing images of planets like Jupiter and Saturn.
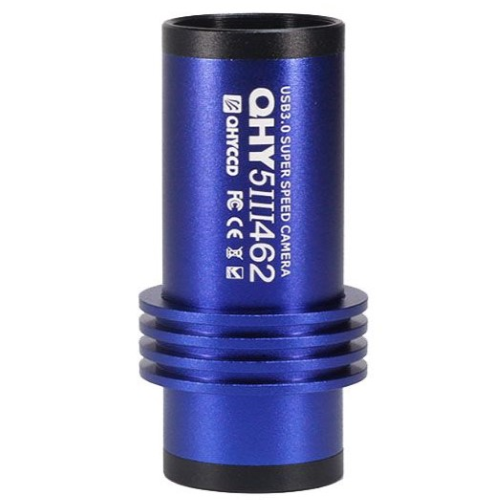
You can also use "mini" style dedicated astro-cams, like the QHY 5III462. These small astro-cams are often used for auto-guiding, but they also work as a standalone astrophotography camera. Since they fit neatly in 1.25" eyepiece adapters, you won't need any extra equipment to connect them to your telescope.
Tips
Dedicated astrophotography cameras are often designed with specialized equipment in mind. Without a motorized mount and precise tracking, these cameras will somewhat be limited in what they can capture. If you want to buy a dedicated astro-cam for your Dobsonian telescope, we recommend that you spend some time researching which model will best fit your needs.
Since you need to use an external device to control a dedicated astro-cam, and manually tracking with a Dobsonian Telescope requires constant attention, this combo works best when you split the task between two people. Alternatively, you can record a video or set the camera to capture images in regular intervals, giving you time to adjust the scope between frames.
Tips and Tricks for Imaging the Universe through a Dobsonian Telescope!
Now that you've learned how to connect a camera to your Dobsonian telescope, all that's left to do is get out there and start capturing some images! If you want to explore some methods used to capture images with a Dobsonian telescope, check out the tips and tricks below!
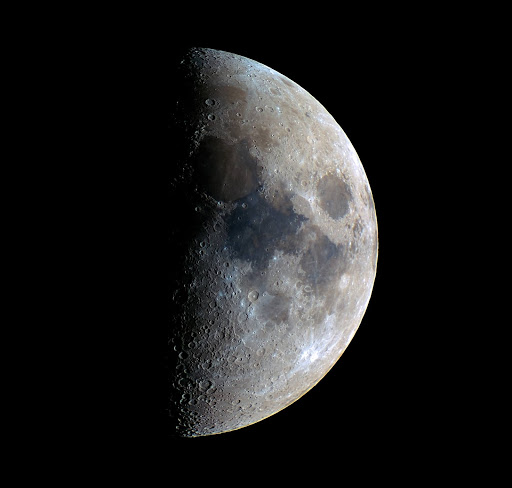
Imaging the Moon: Capturing a stunning image of the Moon with a Dobsonian telescope is easy! Simply attach your camera of choice, locate the Moon, and start snapping some shots. If you are using a smartphone, try using a low power eyepiece. This will make the Moon appear smaller, but it will also give you more room to frame the shot and reduce the need to reposition the scope. If you want to learn more about imaging the moon with a DLSR, check out the our Beginners Guide to Imaging the Moon! If you’re using a DSLR or dedicated astro-cam, you can try stitch multiple images together and create a high-resolution mosaic. Check out this article to learn How to Create a Lunar Mosaic!

Imaging Nebulae: By taking dozens, even hundreds, of photos of the Orion Nebula or the Andromeda Galaxy, you can increase the SNR (signal-to-noise ratio) of your image by stacking them in a program like DeepSkyStacker or Siril. This will take some patience, as you'll need to manually adjust the scope in between frames, but with practice it’s certainly possible to capture some unbelievable photos. If you want to learn more about imaging deep sky objects with a DSLR, check out the follwoing guide to learn How to Photograph the Andromeda Galaxy with a DSLR.

Imaging Planets: A more difficult challenge is taking photos of the planets with your Dobsonian. Although the planets are huge, they are very far away! Because of that, they only appear a fraction of the size of the Moon in the sky. To be able to capture the planets, we need a lot of magnification! If you’re using a smartphone or a DSLR, your best bet is to use eyepiece projection or a 3x Barlow lens or 5x Barlow lens to be able to capture the planets. Do be aware though that as you increase magnification, you also increase how quickly the planets drift through the field of view. Check out this guide if you want to learn more about Planetary Imaging.
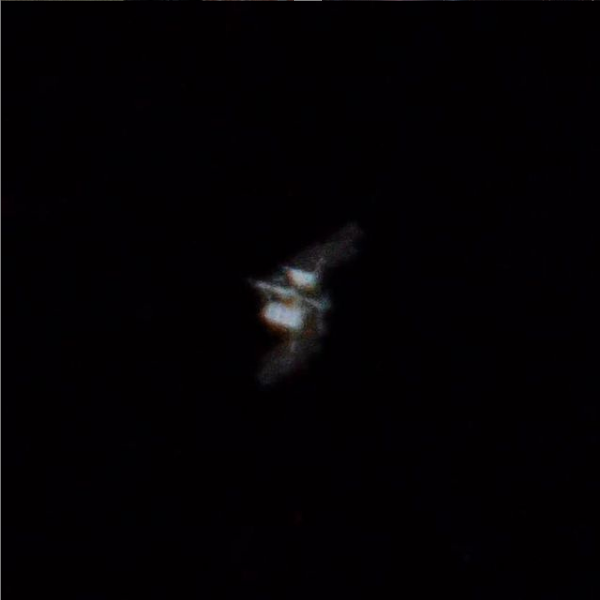
Imaging the ISS: One of the most challenging yet rewarding targets you can photograph with your Dobsonian is the International Space Station. In fact, many astrophotographers prefer a Dobsonian to photograph the International Space Station. This is because the space station moves incredibly fast, well over 17,500mph! As a result, most tracking mounts are unable to track the space station as it flies by overhead. Dobsonian, on the other hand, can be fast enough to keep up if you track it by hand.
To do this, you’ll need as much magnification as possible. When tracking the station, keep your telescope ahead of the station for 1-2 seconds, and then take as many quick exposures as possible, adjusting, when necessary, as the ISS moves through the telescopes FOV. Most of your images will be a miss, but if you’re lucky you should find that a few of your frames have the space station in them! You will be able to clearly see the solar panels and some other details on the space station.
This Article was Originally Posted on 05/19/2021
Click the arrow above to see MLA, APA, and Chicago Manual of Style citations.
MLA:
High Point Scientific Team. "Astrophotography with a Dobsonian Telescope," AstronomyHub, High Point Scientific, 22 Oct. 2024, https://www.highpointscientific.com/astronomy-hub/post/astro-photography-guides/astrophotography-with-a-dobsonian-telescope.
APA:
High Point Scientific Team. (2024, October, 22). Astrophotography with a Dobsonian Telescope. High Point Scientific. https://www.highpointscientific.com/astronomy-hub/post/astro-photography-guides/astrophotography-with-a-dobsonian-telescope
Chicago Manual of Style:
Bibliography:
High Point Scientific Team. "Astrophotography with a Dobsonian Telescope," AstronomyHub (blog), High Point Scientific, October 22, 2024. https://www.highpointscientific.com/astronomy-hub/post/how-to-photograph-the-andromeda-galaxy-with-a-dslr.
Footnote:
High Point Scientific Team, "Astrophotography with a Dobsonian Telescope," AstronomyHub, High Point Scientific, July 9, 2021, https://www.highpointscientific.com/astronomy-hub/post/astro-photography-guides/astrophotography-with-a-dobsonian-telescope.
Glossary
1.25” & 2” Diameter
Typically these are used to describe eyepieces, referring to the outside diameter of the barrel that is inserted into the focuser or diagonal for visual astronomy. However, as some astrophotography setups do use/ reuse some of the same connections, this is seen in some astrophotography accessories - most notably nosepieces.
Backfocus/Backfocal Distances
All optical systems have a point at which an in-focus image is formed, and for astrophotography it is at this location that the camera sensor should be placed. When the telescope is used without corrective elements, this is done easily with the focuser mechanism; and so long as an image can be brought into focus, optimal optical performance will be achieved. However, with corrective elements, oftentimes there is a certain distance that the camera sensor needs to be placed away from the rear of the corrector for optimal performance. This will be listed as the backspacing or backfocal distance for the corrective element.
Corrective Element
This refers to an optical accessory such as a field flattener, coma corrector, or reducer. These improve some facets of a telescope’s performance, such as optical distortions that might otherwise appear on the edge of the frame; or augments it, for example by providing a wider field of view.
Dedicated Astronomy Camera
These cameras don’t look like what one traditionally thinks of when imaging a camera; instead taking the form of cylinders or pucks, with no physical controls, displays, or viewfinders to speak of. These require a computer or WiFi control device to take images, with more advanced models additionally requiring external power. What they give in return for all of these concessions is granular control over the sensor settings, increased sensitivity to wavelengths that more traditional cameras filter out, options for deBayered sensors (true monochrome), designs that easily connect with astronomy equipment, and in some cases cooling for increased performance.
Diagonal
This is an accessory that is used to redirect the light passing through the telescope in a different direction. This is done to provide a more comfortable viewing angle for telescopes designs that would otherwise place the eyepiece in an awkward place for viewing. This is not a concern for imaging, and only serves to provide an extra surface to lose some light from; consequently, the diagonal is typically removed even in very basic imaging setups.
DSLR/Mirrorless Camera
What one may consider a “regular” camera; used for everyday photography and feature an interchangeable (removable) lens system. Popular brands from this category that also enjoy wide support in the astrophotography hobby are Sony, Canon, and Nikon.
Focuser Knob
This component allows the end user to adjust focus. On refractors and some reflectors this is done by moving the visual observing or imaging equipment; other optical designs like SCTs move the optical elements. Typically, there are three focusing knobs to accomplish this - one coarse, and then a dual speed set of two that provide coarse and fine focusing - however SCTs will often just have one that provides fine focus only.
Focuser Tube/Drawtube
On reflectors such as a Newtonian & RCs, as well as on most all refractors, there is a section that can move in and out of the main body of the telescope. It is here that visual observation or astrophotography equipment is connected, so that they can then be moved to focus on the object in view. This moving section is known as the focuser tube or drawtube.
Image Circle
This specification refers to the area where an image is formed by the optics/ corrective element. This is useful for assessing whether a certain camera sensor size will be supported by the optics, or if vignetting/ poor performance will be seen in frame.
Modified DSLR/Mirrorless Camera
A type of DSLR or mirrorless camera that has had a filtering component removed. This component, a piece of glass, is put in place to block out frequencies that would otherwise make “regular” images look unnatural as modern sensors are sensitive to a wider range of frequencies than the human eye can perceive. However, there are some frequencies on the edge of this range that are important to astrophotography (mainly Ha), which these filters block to some degree. Accordingly, removal of this filter will provide better astrophotography performance, but impact “regular” photo taking unless a clip-in or lens filter that filters these frequencies is used. Given the difficulty of removing this filter, this is something most users need to work with 3rd parties on.
Nosepiece
An adapter that allows cameras to be installed in place of visual observation equipment such as diagonals or eyepieces. These adapters feature threading for a T-Ring or camera on one side, and an 1.25” or 2” barrel on the other.
Native Backfocus/Flange Distance
These terms are used to describe the distance from the camera’s connection point to its sensor. This is important for back spacing calculations, to account for spacing the camera will be “adding” on its own. Each term is used to describe the same concept with two different systems, with native backfoucs being used with dedicated astro cameras and flange distance used with DSLR/ mirrorless cameras; however, this rarely comes into play with DSLR/ mirrorless cameras as the T-Rings produced for these systems add the requisite amount of space to for a 55 mm backfocus system.
Rough Focus
Just as the name implies, this refers to focusing on a telescope system such that stars are both visible and fairly compact (but likely not the pinpoints that they will be when things are finely focused). This can be done at night prior to a fine focusing process (such as using a Bahtinov Mask or electronic focuser and V-Curve), but also during the day; where the telescope is pointed at and then focused on a distant object, setting it close to the proper focus point for a fine focus process.
Sensor Size (Full Frame, APS-C, Micro 4/3)
Imaging sensors come in many different proportions, such as 4:3 or 1:1, and physical sizes. There are some common combinations that have received a name - full-frame, APS-C, micro four thirds (4/3). The most important component of sensor size for astrophotography is the measurement from corner to corner (diagonal) of the sensor, which can then be compared to a telescope/ corrective element's image circle to assess how well the two may pair.
Spacers
These are fairly simple components, designed to add spacing to an imaging system. While there are some sizes that have become common due to corrective element backspacing, dedicated astronomy camera native backfocus, and popular accessory thicknesses coalescing around certain spacing distances, there are still plenty of unique sizes and thickness available for unique builds/ equipment.
T-Adapter
Typically this is used to describe an accessory for SCT telescopes, which is threaded to the back of the OTA or reducer (replacing the visual back). These spacers add enough space to the imaging train such that only the industry standard 55 mm of backspacing remains. For information on the adapter that connects directly to a DSLR/ mirrorless camera, see T-Ring.
T-Ring
A T-Ring is an accessory that is used to connect a DSLR/ mirrorless camera to threaded connections. These have a camera lens mount on one side, and a female/ internally threaded connection on the other in either M48 or M42. Most (but not all) T-Rings will set the camera at 55 mm of backspacing, making connections easy.
T2/T2 Thread
Connections listed as T2/ T2 thread/ T2 thread diameter are referencing a M42x0.75 standard. This shorthand originates from the days when astrophotography was done with film and remains popular to this day, though referring to this type of connection simply as M42 is becoming more prevalent. It is noteworthy that at this point in time there is no consensus on what thread pitch should be used for M42 (or M48) threads, though most are close to the 0.75 mm specification. As a result, while most T2 thread size/ M42 components will thread together, on occasion you may encounter components with these labels that do not work together.
Visual Back
The visual back is the connection from the focuser where visual accessories are attached. Typically, this is used to describe a component of a refractor or SCT, which can be removed to allow for a corrective element (or a different visual accessory) to be connected.

Learn More
Interested in learning more about telescopes, astrophotography, and more? Not sure where to begin? Check out our Astronomy Hub!
Click the arrow above to see MLA, APA, and Chicago Manual of Style citations.
MLA:
High Point Scientific Team. "Astrophotography with a Dobsonian Telescope," AstronomyHub, High Point Scientific, 22 Oct. 2024, https://www.highpointscientific.com/astronomy-hub/post/astro-photography-guides/astrophotography-with-a-dobsonian-telescope.
APA:
High Point Scientific Team. (2024, October 22). Astrophotography with a dobsonian telescope. High Point Scientific. https://www.highpointscientific.com/astronomy-hub/post/astro-photography-guides/astrophotography-with-a-dobsonian-telescope
Chicago Manual of Style:
Bibliography:
High Point Scientific Team. "Astrophotography with a Dobsonian Telescope," AstronomyHub (blog), High Point Scientific, October 22, 2024. https://www.highpointscientific.com/astronomy-hub/post/astro-photography-guides/astrophotography-with-a-dobsonian-telescope.
Footnote:
High Point Scientific Team, "Astrophotography with a Dobsonian Telescope," AstronomyHub, High Point Scientific, October 22, 2024. https://www.highpointscientific.com/astronomy-hub/post/astro-photography-guides/astrophotography-with-a-dobsonian-telescope.